Source:
BitTorrentSyncUserGuide.pdf
http://btsync.s3-website-us-east-1.amazonaws.com/BitTorrentSyncUserGuide.pdf
See also:
BTSync Detailed User Manual
./BTSync_Notes.html
Table of Contents
- About BitTorrent Sync
- Known issues
- Installing BitTorrent Sync
- Quick start
- BitTorrent Sync user interface
-
Preferences and configuration
Device name - Updates - Notifications - Limits - Relay server - LAN - DHT - SyncArchive - Known hosts - Secret - QR code - WebUI - Con fig file - .SyncIgnore - Versioning
BitTorrent Sync User Guide
About BitTorrent Sync
BitTorrent Sync is a simple tool that applies p2p protocol for direct live folder sync with maximum security, network speed and storage capacity. It has native versions for Mac, Windows and Linux, as well as native NAS integration.
Technology
Your files are synchronized through peer-to-peer (p2p) protocol, where each of the connected computers acts as a ‘client’ and a ‘server’ at the same time.
Connection
The devices in sync are connected directly. Connection is established by use of UDP, NAT traversal, UPnP port mapping, and relay server. If your devices are on a local network, BitTorrent Sync will synchronize them without the Internet connection.
Security
For security all the traffic between devices is encrypted with AES cypher and a secure key created on the base of your Secret - a random string (20 bytes or more) that is different for every folder.
System requirements
- OS X Snow Leopard or newer
-
Windows XP SP3 or newer*, Windows Server 2008 or newer
- * Windows XP 64-bit is not supported. BitTorrent Sync is not guaranteed to work on unsupported platforms.
- Linux with kernel 2.6.16 (glibc 2.4) or newer on ARM/PPC/i386/x86_64
- FreeBSD 8.3 or newer
- iOS 5.0 or newer
- Android 2.2 or newer
NAS Support
You can install BitTorrent Sync on Network Attached Storages (NAS) running on Linux with ARM, PowerPC, i386 and x86_64 architecture. SSH access to NAS is required.
BitTorrent Sync was successfully tested on devices from the following producers:
Synology, Western Digital (WD), Iomega, D-Link and QNAP.
Known issues
1. BitTorrent Sync may handle events incorrectly in the following cases:
- .!sync files are changed outside of BitTorrent Sync
- no free disk space left
Installing BitTorrent Sync
1. Mac and Windows
To install BitTorrent Sync on your Mac or Windows computer, follow the usual installation path.
2. Linux and NAS devices
Depending on what system you use, choose appropriate BitTorrent Sync binary (i386, x86_64, ARM, PPC) and run it from the command line.
To run BitTorrent Sync on your NAS:
• Enable SSH access on your NAS device (depends on vendor).
• Check CPU type of your NAS. Currently BitTorrent Sync supports ARM, PPC, i386 and x86_64 processors.
• Download and unpack the right BTSync binary archive.
• Connect to NAS using SSH and copy BitTorrent Sync binary there.
• Run ./btsync from the directory where it is located for use via Web UI only. If you want to use a config file, follow these steps.
On Linux and NAS, BitTorrent Sync can be accessed and managed via Web UI or command line.
WebUI can be accessed by default at YourLocalIP:8888/gui
* Default port 8888 can be changed in the config file (get example by running --dump-sample-config).
* When launched for the 1st time, WebUI is accessed without authorization. We recommend to set up your user login and password and adjust the listening IP according to your security preferences.
CLI (Command line interface) is an alternative way of managing BitTorrent Sync. You can get a list of available commands by running BitTorrent Sync with --help argument.
3. Mobile devices
You can download BitTorrent Sync for Android on Google Play Application for iPhone and iPad is available in AppStore.
Quick start
1. Adding folders to sync
To add a folder to BitTorrent Sync, click on the '+’ button (Mac) or “Add a Sync Folder” button (Windows) at the bottom of the Folders tab.
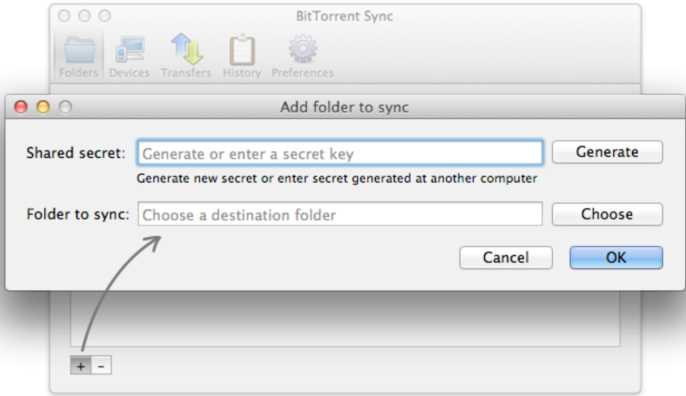
In the opened window, enter a Secret Key that someone shared with you or generate a new one, and then choose or create a folder you would like to sync.
* If asked, configure your firewall at the 1st run to allow BitTorrent Sync accept incoming connections.
2. Connecting folders with other devices
After you added a new sync folder, you can find a set of secret keys for it in the folder’s advanced preferences (access it by right click on the folder). As a quicker alternative, use context menu to copy the secret key to the clipboard.
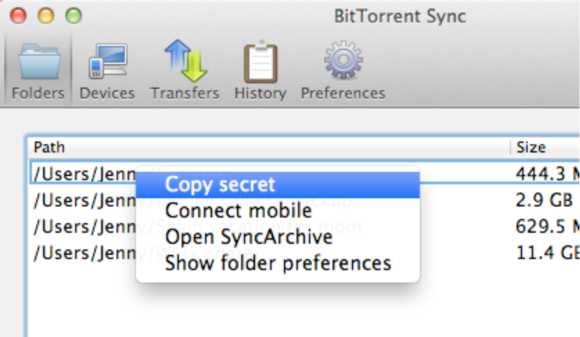
If someone shared secret key with you, just use it when adding a new sync folder. Once a device is online, synchronization process is initiated immediately.
3. Staying synchronized
After you are online and connected, BitTorrent Sync will synchronize chosen folder(s) immediately. Then you can leave it run in the background or access the app’s interface from the System Tray (Mac) or Notification Area (Windows).
You can keep track of the synchronization process in the History tab.
BitTorrent Sync user interface
In BitTorrent Sync you can see info about the connected devices, folders in sync, ongoing transfers and speed, history of download and upload, and preferences.
1. Connected Devices
In the ‘Devices’ tab you can see the devices you are connected to and what folders you sync with each of them.
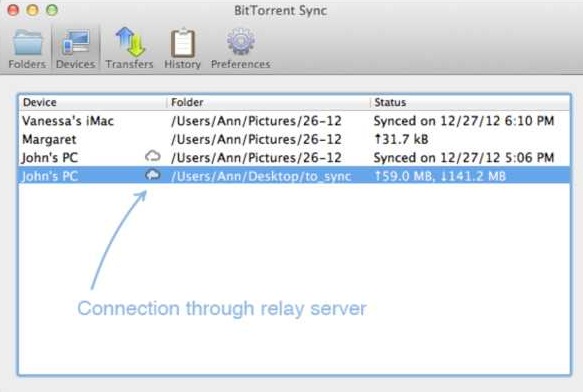
Status column shows you when sync is finished, as well as the total amount of the data you can upload to or download from a device (empty values are not displayed).
Small cloud icon indicates that you are connected through relay server.
2. Folders in Sync
‘Folders’ tab shows you the list of folders in sync, as well as their sizes and the number of files inside.
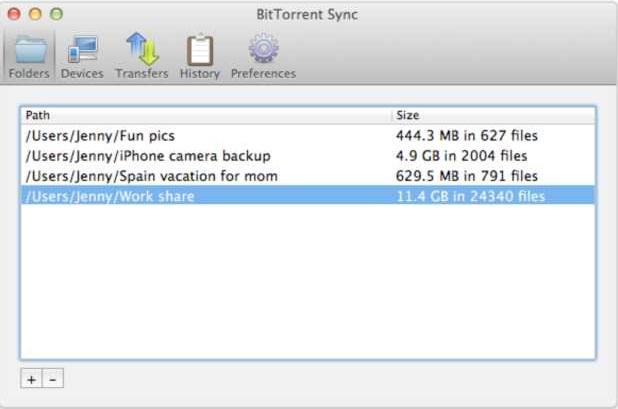
After you add a new folder, BitTorrent Sync spends some time indexing it (calculating checksums of the files for further optimization of the transfer process). Indexed files start syncing immediately, even before the whole folder is indexed.
Folders can be opened in Mac Finder or Windows Explorer (double click on the folder ).
3. Current transfer jobs
In the ‘Transfer’ tab you can see what files are being transferred at the moment, the list of devices you transfer to / from, as well as upload and download speeds for each device.
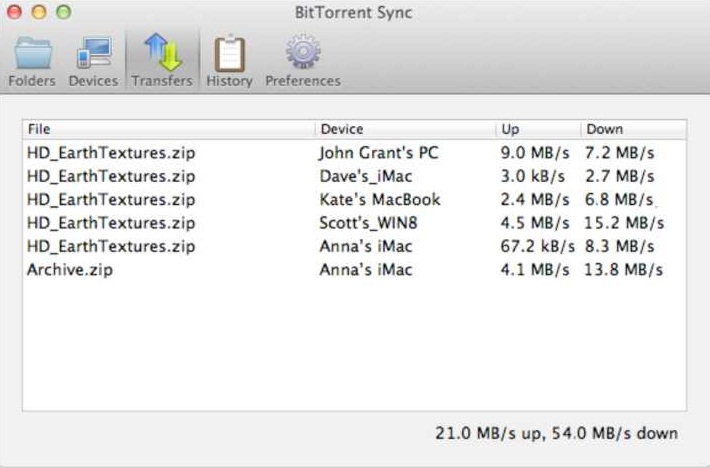
* Total transfer speed is shown in the right bottom corner.
4. Syncing history
BitTorrent Sync logs several types of events: adding, deleting, renaming, updating files and end of synchronization.
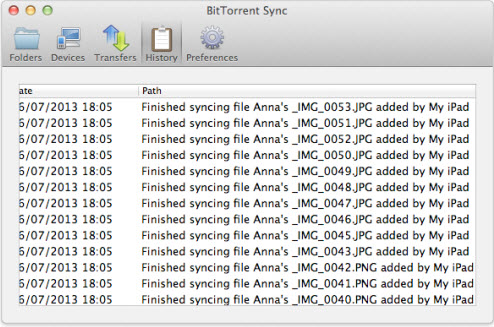
* These events are shown for each of the connected devices.
Preferences and configuration
Device name - Updates - Notifications - Limits - Relay server - LAN - DHT -SyncArchive -Known hosts - Secret - QR code - WebUI - Config file
- .SyncIgnore - Versioning
1. Mac and Windows
General preferences for the app can be set in the ‘Preferences’ tab.
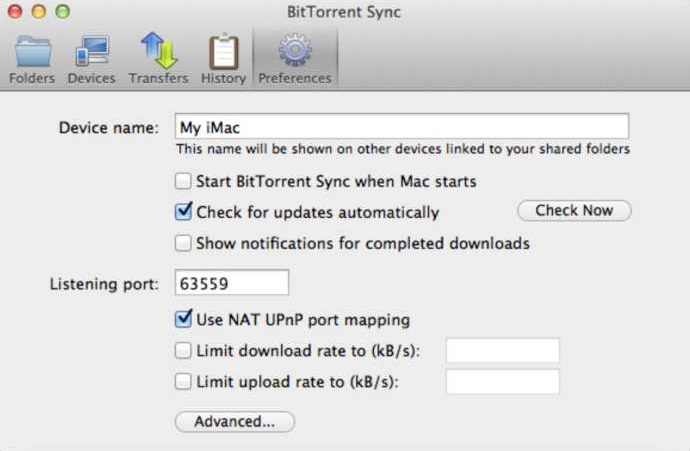
Here you can change the name of your computer as it is shown on other devices, configure updates and notifications, change the listening port and map it using UPnP, as well as set limits for total upload and download speeds.
Note that by default speed limits are not applied in the local network (can be changed in Advanced preferences).
Advanced preferences
Advanced preferences are intended for expert users. Modify at your own risk!!
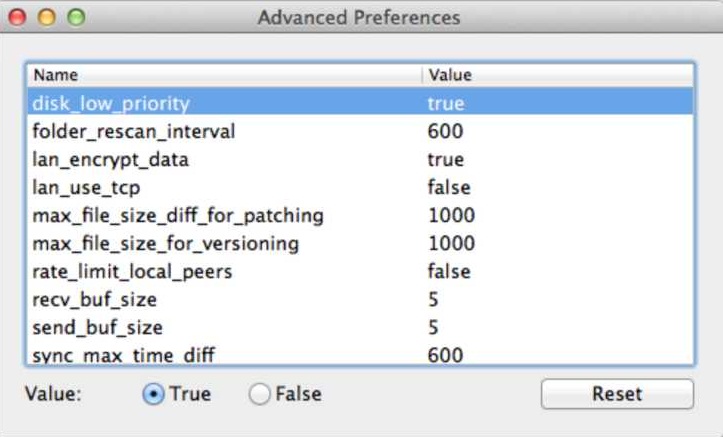
disk_low_priority sets priority for the file operations on disc. If set to false, Sync will perform read and write file operations with the highest speed and priority which can result in degradation of performance for other applications.
folder_rescan_interval (seconds) sets a time interval for rescanning sync folders. This serves as an additional measure for detecting changes in file system.
lan_encrypt_data - if set to true, will use encryption in the local network.
lan_use_tcp - if set to true, Sync will use TCP instead of UDP in local network.
* Note: disabling encryption and using TCP in LAN can increase speed of sync on low-end devices due to lower use of CPU.
max_file_size_dif_for_patching (MB) determines a size difference between versions of one file for patching. When it is reached or exceeded, the file will be updated by downloading missing chunks of information (patches). Updates for a file with a smaller size difference will be downloaded as separate files.
max_file_size_for_versioning (MB) determines maximum file size for creating file versions. When this size is exceeded, versions will not be created to save space on disk.
rate_limit_local_peers applies speed limits to the peers in local network. By default the limits are not applied in LAN.
send_buf_size (MB) is the amount of real memory that will be used for cached send operations. This value can be set in the range from 1 to 100 MB.
recv_buf_size (MB) is the amount of real memory that will be used for cached receive operations. This value can be set in the range from 1 to 100 MB.
sync_max_time_diff (seconds) shows maximum allowed time difference between devices. If the difference exceeds this limit, the devices will not be synced as it may result in incorrect tracing of file changes.
sync_trash_ttl (days) sets the number of days after reaching which files will be automatically deleted from the .SyncArchive folder.
* Note: BitTorrent Sync should be restarted to apply changes in advanced preferences!
Folder specific preferences
Folder specific preferences can be accessed via right click on a folder in the ‘Folders’ tab.
‘Properties’ tab
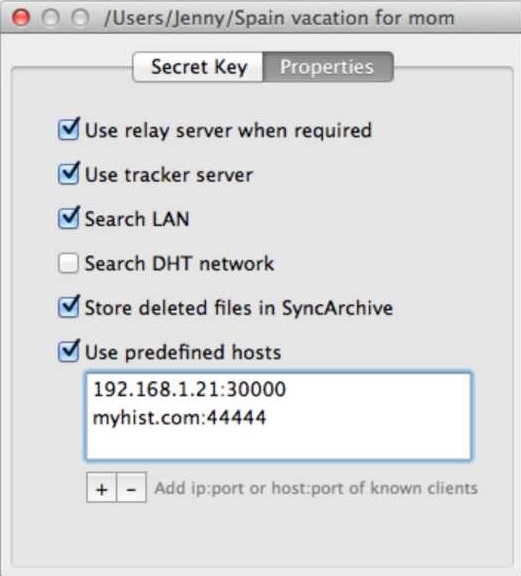
- Relay server is used when it is impossible to connect to other devices directly due to NAT issues.
- Tracker server can be enabled to facilitate communication between peers.
- Store deleted files in SyncArchive saves all the files deleted on other clients to the hidden ‘.SyncArchive’ within your destination folder (unless unchecked in preferences). The files deleted on your computer are moved to system Trash (depending on OS preferences).
- Use predefined hosts is an option to specify ip:portor host:portoi known clients. So if one of your devices has a static and accessible IP, peers can connect to it directly.
‘Secret Key’ tab
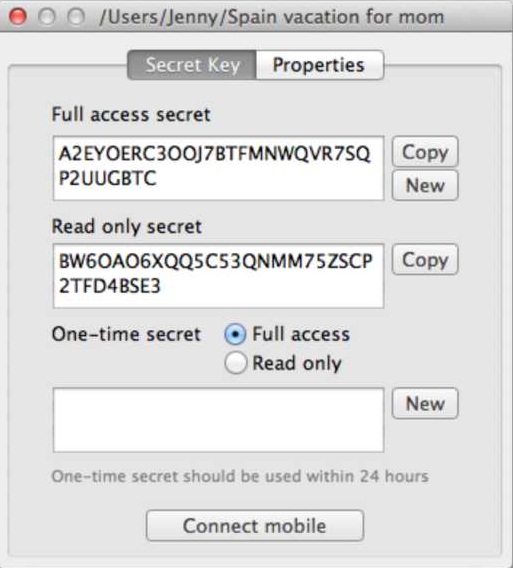
This tab is used for managing secrets and generating QR codes for connecting mobile devices.
- Full access secret is a master key for connecting folders. All the folders added with this secret will be granted a full set of permissions for two-way synchronization. Master secret can be changed at any time or replaced with a custom Base64 string more than 40 symbols long (new folder secret should be re-entered on all the devices in sync).
- Read only secret is generated on the basis of the master secret and is used for one-way synchronization. It means that any folder with a read-only secret will be fully synced, but changes made in it will not be reflected in the folders operated by a master secret. Also, it is not possible to change secret for read only folders.
- One-time secret is a security option available for the folders operated by a master secret. You can generate either a full access or read only short key which can be used only once and should be activated within a limited period of 24 hours. When connected, folder added with a one-time secret will receive a full master or read-only secret from the device where the one-time secret was generated.
- Connect mobile button shows a unique QR code that is based on the secret keys for your sync folder and can be either full access or read only. This QR code serves as a means to connect folders on mobile devices to the folders on your computer.
2. Linux and NAS devices
WebUI is the default way of accessing BitTorrent Sync. It can be reached at:
YourLocallP:8888/gui.
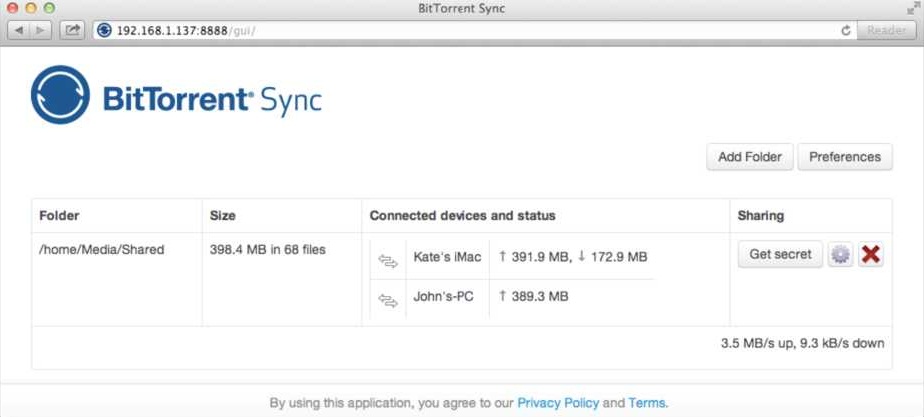
You can manage both general and folder preferences via WebUI the same way as from a desktop application.
Config file
Config file offers a slightly wider variety of options to configure. It is a JSON format file.
In order to set preferences using a config file, first get a sample config by running --dump-sample-config. You’ll see a list of options and commentary.
You can save config file to any desired location.
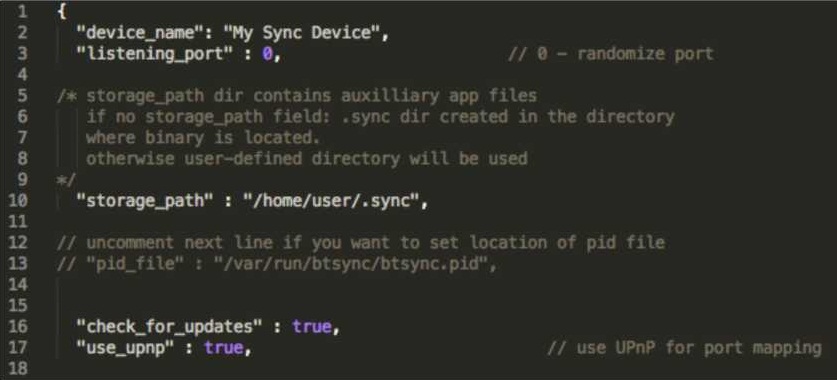
* For example, to save it to the current directory, run:
./btsync --dump-sample-config > sync.conf
After you saved the config file, you can customize it and then run BitTorrent Sync with the modified config.
* For example, if your config file is in the same directory with BitTorrent Sync, run:
./btsync --config sync.conf
* Before running BitTorrent Sync with config file, make sure it is a valid JSON.
Otherwise, you’ll get an error message.
Sample config
Here is the sample config that will be generated if you execute:
./btsync --dump-sample-config > sync.conf
Note: some additional comments are added in this version to clarify some points that might not be apparent otherwise.
All the text after // on each line is considered to be a comment, and so is all the text between /* and */. These are known as C-style comments and will be ignored by btsync.
{
  "device_name": "My Sync Device",

// If listening_port is set to any value other than 0,
// than this port will always be used even if you restart
// the btsync. Othewise, if set to 0, then it will be a
// random port number every time you restart btsync.

  "listening_port" : 0,                       // 0 - randomize port

/* storage_path dir contains auxiliary app files
   if no storage_path field: .sync dir created in the directory
   where binary is located.
   otherwise user-defined directory will be used.

   Note: this is not the place where your actual files are saved
   for your sync folder. This is only used for the databases
   for your sync folders and various parameters and settings,
   log files, etc.

   The default location on Ubuntu is:
      /var/lib/btsync
   But it may be anything, as defined in your .conf file.
*/

  "storage_path" : "/home/user/.sync",

// uncomment next line if you want to set location of pid file
// "pid_file" : "/var/run/btsync/btsync.pid",

  "check_for_updates" : true,

  "use_upnp" : true,                              // use UPnP for port mapping

/* Speed limits in kB/s
   0 - no limit
*/
  "download_limit" : 0,
  "upload_limit" : 0,

/* remove "listen" field to disable WebUI.
   remove "login" and "password" fields to disable credentials check
*/
  "webui" :
  {
    "listen" : "0.0.0.0:8888",
    "login" : "admin",
    "password" : "password"
  }

/* !!! if you set shared folders in config file WebUI will be DISABLED !!!
   Shared directories specified in config file
   override the folders previously added from WebUI.

   Note: There may be multiple folders defined in case you want
   to include a number of different folders in the sync process.

   The structure of the shared folder stuff is:

      "shared_folders" :
      [
      {
         shared folder 1 parameters in here
         (copy paste the contents inside your current config
		 and modify them to configure multiple folders).
      },

      {
         shared folder 2 parameters in here
      },

      {
         shared folder 3 parameters in here
      }
      ]

   So, all you need to do is to copy the code block from your config
   file which is enclosed by { } and paste it after
   the existing one using a comma to separate them.
   Then it is just a case of editing the parameter values accordingly.

   NB. Make sure you don't copy the full shared folder block
   ie the square brackets. You just want the block inside.

   Notice the commas after right curly braces (},)
   at the end of each shared folder except of last one.
   If you don't include the comma, after the brace,
   you will get an error.

See: "Linux - Multiple shared Folders in config file" thread:
http://forum.bittorrent.com/topic/20920-linux-multiple-shared-folders-in-config-file/#entry55290
*/

/*
  ,
  "shared_folders" :
  [
    {
//  use --generate-secret in command line to create new secret
      "secret" : "MY_SECRET_1",                   // * required field

// dir is directory name of the sync folder.
// It is where your actual sync files go.
      "dir" : "/home/user/bittorrent/sync_test", // * required field

//  use relay server when direct connection fails
      "use_relay_server" : true,

      "use_tracker" : true,

// DHT is used if you do not want to rely on BT trackers
// for any reason, such a security considerations for example.
// Using the DHT protocol, btsync will broadcast the packets
// to the entire net and all the nodes that have the same share
// will respond with the lists of nodes they are connected to
// on this share (main data folder or hash).

// If you use DHT, then BT won't be able to interfere in peer
// discovery for whatever reason they may decide to do it.
// But then the other nodes with this share have to also
// enable the DHT.

// If you enable DHT and all the nodes that want to sync
// with this share also have it enabled, then you do not
// even need to set "use_tracker" : true.
// But, unfortunately, the default configuration does NOT
// enable the DHT by default. So, any unexperienced users
// are not likely to enable the DHT, and won't be able
// to discover you.

      "use_dht" : false,

      "search_lan" : true,

// use_sync_trash means enable SyncArchive to store
// files deleted on remote devices

      "use_sync_trash" : true,

// known_hosts specifies the list of hosts to attempt
// connection without additional search.
// On a private network, where which you want to sync between
// the number of nodes with static IP with max. security,
// you add the IP/domain names and ports for all the nodes
// to their configuration files.
// In this case, you do not need to use the DHT, nor to
// use the BT tracker (set "use_tracker" : false).
// Nor do you want to use the relay server", so you set:
// "use_relay_server" : false.
// This way, you leave the minimal footprint on the net.

// Q: Can I force Sync to do local network (LAN) syncing only
// and not sync via the Internet?

// Yes - simply disable the Relay, Tracker, and DHT options
// (these are per-folder settings). Sync will then no longer
// connect to any remote devices (outside your local network).

      "known_hosts" :
      [
        "192.168.1.2:44444", "10.10.0.10:55555"
      ]
    }
  ]
*/

// Advanced preferences can be added to config file.
// Info is available in BitTorrent Sync User Guide.
// Here they are (block-commented out here):

/*
“disk_low_priority”: true
“rate_limit_local_peers”: false
“folder_rescan_interval”: 600
“sync_max_time_diff”: 600
“lan_encrypt_data”: true
“sync_trash_ttl”: 30
“lan_use_tcp”: false
“send_buf_size”: 5
“max_file_size_diff_for_patching”: 1000
“recv_buf_size”: 5
“max_file_size_for_versioning”: 1000
*/
}
Advanced application settings
Advanced application settings are available but not shown on Linux by default. You can manage them via the config file. Just add some or all of the following lines to the config file and change the default values as needed:
“disk_low_priority”: true
“rate_limit_local_peers”: false
“folder_rescan_interval”: 600
“sync_max_time_diff”: 600
“lan_encrypt_data”: true
“sync_trash_ttl”: 30
“lan_use_tcp”: false
“send_buf_size”: 5
“max_file_size_diff_for_patching”: 1000
“recv_buf_size”: 5
“max_file_size_for_versioning”: 1000
* You need to restart BitTorrent Sync in order to apply changes of advanced preferences.
3. Ignoring files
If you have files in your sync folder that you don’t want BitTorrent Sync to track, you can use .SyncIgnore.
.SyncIgnore is a UTF-8 encoded .txt file that helps you specify single files, paths and rules for ignoring during the synchronization job. It supports ‘?’ and ‘*‘ wildcard symbols.
* Note that .SyncIgnore is applied only to the folder where it is contained and will not work with the files that have already been synced.
4. Versioning
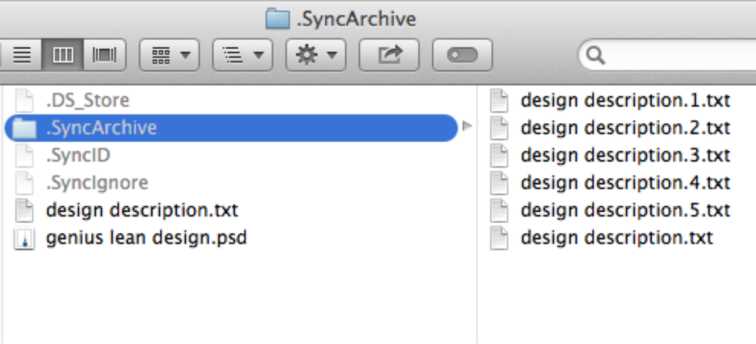
BitTorrent Sync supports versioning starting from version 1.1.16. By default it creates and stores all the old copies of edited files for the period of 30 days (this period can be changed in General advanced preferences - sync_trash_ttl). All the versions are stored in the hidden .SyncArchive directory within your sync folder that you can open by right click on the sync folder within the application and choosing ‘Open SyncArchive’.
Old versions of a file are marked by adding numbers to its name, where the file with the highest number is the latest.
BitTorrent Sync on mobiles
BitTorrent Sync is available for install on the following mobile platforms*:
- Android 2.2 and higher
- iOS 5.0 and higher
* Compatible with BitTorrent Sync for desktop version 1.1.27 or later.
1. Adding sync folders and connecting
Starting sync on your mobile is quite the same as on your desktop. The difference is, we introduced a QR code as a way to connect mobiles to a sync folder on a computer more easily. Here’s how it works:
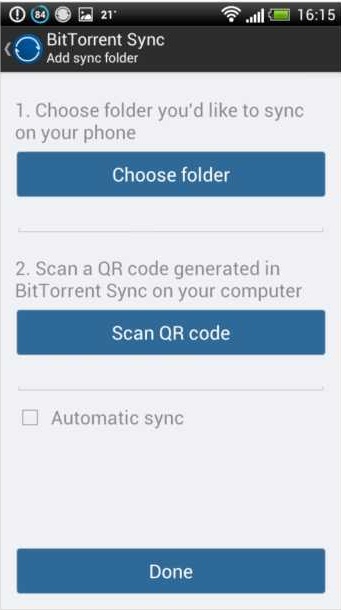
On Android
- Tap the Add Folder icon in the Sync tab.
- Choose a folder you’d like to sync.
- Scan the QR code for a sync folder from your computer. You can also enter or paste the secret manually in the text field.
- Check or uncheck Automatic Sync. If you check Automatic Sync, all files will be downloaded to your phone or tablet automatically. If you leave it unchecked, you’ll need to choose files to download manually. Not sure? Don’t sweat it. This preference can be changed later in Folder Preferences.
- Click Done. You’re ready to go.
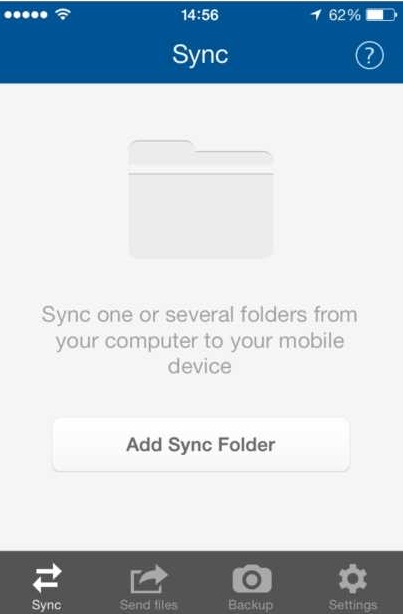
- Tap the Add Folder button (later - icon) in the Sync tab.
- Scan the QR code for a sync folder from your computer. You can also enter or paste the secret manually in the text field.
- Sync folder with the same name as the folder on your computer will be created automatically. You can rename it if you wan a different name.
- Tap the Check mark (Done) and enjoy syncing!
2. Sending files mobile-to-mobile
BitTorrent Sync lets you send files directly from your phone to other BitTorrent Sync-enabled mobile devices.
- Tap Select Files to Send on one of the devices.
- Choose photographs, documents, or any other files you’d like to send.
- After you’ve picked your files, you’ll get a QR code.
- Scan the QR on another device by tapping Receive Files.
- Transfer will start immediately, using the maximum speed of your WiFi or cellular connection.
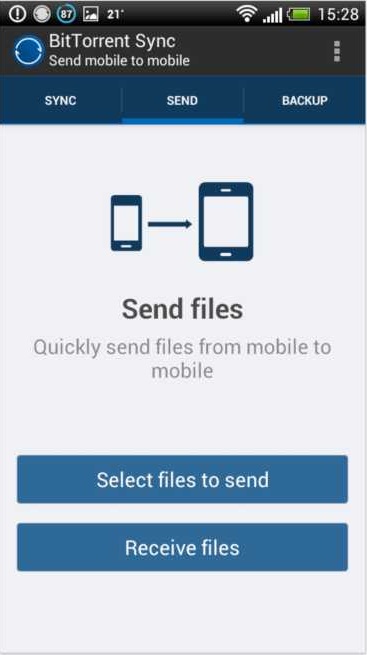
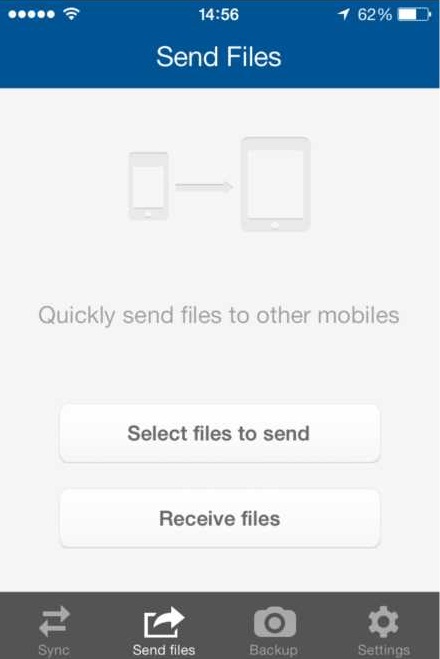
* On Android, you can choose the folder for saving the received files in Settings -> Download folder. By default, the files are stored in the system ‘Download’ folder.
3. Backing up
BitTorrent Sync lets you backup folders and files (on Android) and your entire Camera Roll (on iOS).
Backup folders aren’t connected via QR codes, so you’ll need to enter the secret key manually. To make the process easier, you can e-mail it from the application, or copy the key and send it via an application of your choice. To set up and start backup:
- Tap the Add Folder icon in the Backup tab.
- Choose the folders you want to backup.
- You’ll get a secret key. Copy and enter your key on another device to start backup. You can also send the secret and instructions by email. Later you can access the backup secret by tapping on the added folder in the backup view.
- Tap the Enable button in the Backup tab.
- Sync will create a secret for backing up your Camera Roll automatically. You can either send it to yourself by email or copy it to clipboard and send it by a messenger of your choice. The backup secret can be accessed later in Settings.
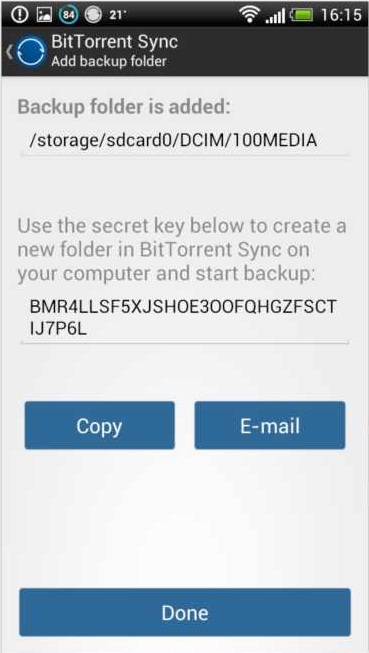
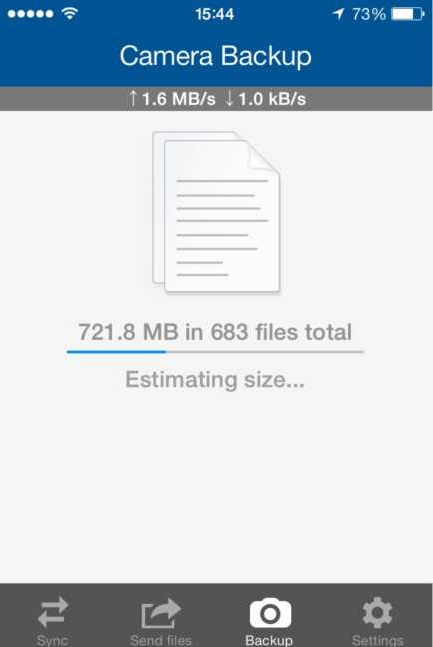
* You can choose to disable backup in the Settings tab -> Camera Backup
4. Permissions
BitTorrent Sync will require the following permissions to be installed on your Android-powered device:
- Full network access allows the app to download sync data to your phone and upload it to other devices connected by your secret key. BitTorrent Inc. does not see or store any of your personal information.
- View network connections allows the app to see information about network connections, such as existing and connected networks.
- View WiFi connections allows the app to access information about WiFi networking: whether or not WiFi is enabled, and the names of connected WiFi devices.
- Modify or delete the contents of your USB storage allows the app to write the files you downloaded to the USB storage, and apply changes to these files.
- Access account data allows the app to use your e-mail for feedback and sending secrets.
- Test access to protected storage allows the app to test a permission for USB storage that will be available on future devices.
- Take pictures and videos allows Sync to connect to other devices. BitTorrent Sync uses the camera feature to scan QR codes.
5. Settings
Here you can change the name of your device as it appears on other devices, choose to use mobile data for sync or restrict all the transfers to Wi-Fi, send feedback or report a problem and see info about BitTorrent Sync.
However, mobile settings on different platforms are slightly different to ensure optimization for each platform’s peculiarities. Below are specific settings for Android and iOS.
On Android
- Use Notification - shows Sync status in the notification area and drawer.
- Auto-start - choose to start Sync on device boot.
- Battery Saver - allows you to set the minimum percent of battery level for carrying out transfers. On reaching this level, Sync will stop all the transfers to save battery life.
- Auto Sleep - when enabled, Sync will automatically go to Sleep mode if there are no active transfers. You can choose how often the application should wake to check for activity updates.
- Download Folder - choose the folder where the files you download from other mobile devices should be saved.
- Backup Sync Settings - saves all the info about existing sync and backup folders as well as settings configuration in a special backup file. Simply choose the folder where you’d like to store the backup file.
- Restore Settings - restores Sync backup settings from file. Restored settings will override existing settings.
On iOS
You can additionally fine-tune Camera Backup settings in the Settings tab.
- Use Wi-Fi only - allows to restrict all Camera Backup transfers even if Mobile data is enabled in General settings.
- Automatic Backup - if enabled, new media from your Camera Roll will start uploading to your computer automatically when you open Sync. Otherwise, you’ll need to start it manually.
BitTorrent Sync API
The BitTorrent Sync API offers to developers a wide range of of possibilities. You can choose to integrate Sync into your app, build upon and improve Sync on your devices, or automate workflows to make your life easier.
In order to use the BitTorrent Sync API, you’ll need a special API key. Fill out this short form to get your key. You’ll then receive an email with all of the info you need to start coding.
Full description of how API works can be found on our site.
General behaviour and FAQ
What is a Secret and how does it work?
- Secret is a key that connects different devices and joins them together. We automatically generate strongly random secrets to ensure their uniqueness. Since each Secret is 20 bytes or more long, it is virtually impossible that other people can see your synced files and download them without it.
- After a folder is added to BitTorrent Sync, the Secret is stored in its advanced preferences and can be accessed by right click on a folder in the “Folders’ tab.
- There are 3 types of secrets: master (full access) secret, read only secret for one-way sync and one-time secrets (both full access and read-only). Read only and one-time secrets may be generated only for folders operated by master secrets.
- API users have an additional option to generate folder secrets with encrypted peer support. Encryption secrets are read-only and make sync data encrypted on the receiver’s side (peers can sync files, but can not see their content or modify them). Such secrets are useful when syncing to an untrusted location.
How do I connect mobile devices (QR code)?
- Mobile device can be connected to a sync folder via a QR code. From your desktop, right-click the folder you want to sync, or go to Folder Preferences, and choose Connect Mobile. The QR code will be displayed. To sync your desktop folder to your mobile device, just scan the QR code using your smartphone.
- However, if you don’t have a QR code at hand when adding a sync folder on your iOS or Android device, you can enter or paste the secret manually in the secret text field.
How soon does synchronization start?
- When a file is added to the shared folder, the changes start syncing immediately (due to the system peculiarities, sync on Mac OS X 10.6 may be delayed up to 10 minutes). If you change a file inside a shared folder, sync will start after the file is saved and/or closed.
- It is also possible to change the period of automatic rescanning of sync folders. You can do it in Advanced application preferences - folder_rescan_interval item. Default rescan period equals 600 seconds (10 minutes).
What do the .Sync and .SyncPart extensions mean?
- When a file gets .Sync and .SyncPart extension, it means that it is being downloaded or updated at the moment. .SyncPart indicates that file updates come by patching.
What happens if a file is deleted on one of the devices?
- Files deleted from a sync folder on your computer are handled depending on your OS preferences (moved to Trash/Recycle Bin/similar folders or deleted completely). On the other syncing devices these files will be moved to the .SyncArchive in their sync folders (.SyncArchive is hidden by default and also stores versions of syncing files).
What if several people make changes to the same file?
- When a file is changed on one of the devices, it will be recreated as a new copy and synced to the other devices. We save only the latest version of the file.
What if files with same names are added from different computers?
- We give human action first priority and always consider it right. That's why if several files with the same name are added on different devices, BitTorrent Sync will synchronize the file that was the latest added to BitTorrent Sync even if it is not the newest version of the file itself. Previously added files will be deleted, but you can find them in .SyncTrash (if enabled in folder preferences).
What happens when I remove folder from BitTorrent Sync?
- If a folder is removed from BitTorrent Sync, all the synced files stay there; incomplete files with the .! sync extension will be deleted.
Does BitTorrent Sync support versioning?
- Yes, versioning is available in BitTorrent Sync. It creates and stores all the old copies of edited files for the period of 30 days (this default period can be changed in General advanced preferences - sync_trash_ttl). The versions are stored in the hidden .SyncArchive directory within your sync folder that you can open by right click on the sync folder and choosing ‘Open SyncArchive’.
- Old versions of a file are marked by adding numbers to its name, where the file with the highest number is the latest.
Is one-way synchronization possible?
- Yes, starting from the version 1.0.95 BitTorrent Sync features one-way synchronization. It is established via read only secret (permanent or one-time). Any folder with a read-only secret will be fully synced, but changes made in it will not be reflected in the folders operated by a master secret.
Can other BitTorrent users see my shared files?
- No. BitTorrent Sync is based on BitTorrent protocol, but all the traffic is encrypted using a private key derived from the shared secret key. That’s why your files can be received and seen only by the people with whom you share your private secret.
Where can I get the latest version of BitTorrent Sync User Guide?
- Since BitTorrent Sync is under active development, we constantly add new features to the app and consequently renew the User Guide. The latest version can always be found here.
Can I build apps based on BitTorrent Sync?
- Yes. BitTorrent Sync offers an API that you can use to integrate into your app, build upon and improve Sync on your devices or automate existing workflows. Get the API key here and start building today. More info about API you can find on our website.
I still have questions, who can answer them?
- Try looking through the unofficial FAQ or search our forum. There are lots of friendly knowledgeable people there (including the developers) who will help. Feel free to post questions there, too, just make sure your question is not already answered.
- No, BitTorrent Sync will not permit you to sync one folder location on your computer to another location on the same computer (i.e. you can't have two shared folders using the same "secret" on the same device)
Can I use BitTorrent Sync to backup from an internal drive to an externally connected USB drive?